Prototype
Development Documentation
Structure
The
following documentation will be deconstructed in sections entailing prototype
classes with their relative blueprint or/and subclass. For each object
described will be provided a list of its inner functionalities both developed
using C++ programming language and the blueprint scripting.
The aim
is to describe what has been personally developed by the team rather than what
is already provided by the Unreal Engine itself.
Pick Up Objects
Pickups objects are fundamental for the game as they serve as items to complete objectives or perform specific tasks (e.g. shooting will require bullets and weapon).
Base class:
“PickupItem”
Child classes:
“GutlingAmmo”, “BatteryPack”, “DuctTape”, “GutlingGun”, “RocketLauncher”, “ID_Card”, “RepairBook”, “RocketAmmo”, “ScrewDriver”, “StorageDrive”, “HealthPack”.
Functionality:
Each pickup class makes use of the built-in BeginOverlap event (triggered when a the attached collider is overlapping with another object), which in turn will call the inner class method: “Prox_Implementation”.

The above code checks for collision happening with the avatar by casting each object overlapped with an empty Avatar class. If the cast succeeds, the avatar object will be used to call the Avatar Pickup method. The latter only takes the object picked up as a parameter.
Interactive Objects
Interactive objects are all those assets that can interact
with the player itself.
Interactions are used to either increments objective’s state or to simply
trigger its own functionality.
Base class:
“Interactive”
Child classes:
“BatteryCharger”, “FluxCapacitor”, “ForceField”, “GeneralGate”, “LandingPad”, “MainComputer”, “MainGate”, “PC_Desk”, “Radar”, “SpaceShip”, “VirusChamber”.
Functionality:
Most of the interactives object share the same basic
functionality. As for what happens in the pick up
objects, the proximity function is triggered when the player is nearby. Each
interactive will check in the player backpack if a certain object has already
picked up or not and triggers different states accordingly (e.g. trigger door
opening only when the player has collected the ID_Card
object).
Some of them do have some special functionalities and it’s worth taking a further
look at these.
·
VirusChamber: This particular asset will play an animation
and drop an health pack if the player has the ID_Card. This is simply done with a timer, which gets
triggered when the player is close enough and will wait for the animation to
finish before dropping the health pack:
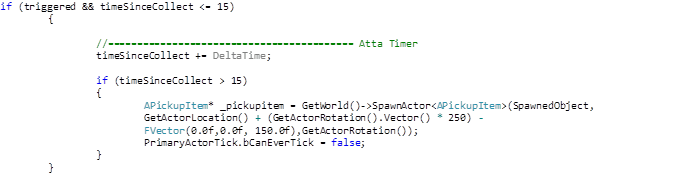
The above code is implemented in the update (called every frame). The
bool triggered is a shared bool between all the Interactive objects (declared
in the base class), and it gets triggered when the player entered the collider
range of action.
·
Main
Gate: The main gate, has the same functionality mentioned above, so when
the player is nearby will play the opening animation and when the player
triggers the exit from the gate area will play the same animation backwards
(closing the gate). Beside the latter functionality, it will as well open and
close every 50 seconds when the player is inside the compound allowing the ants
to crawl in and chase the player position.
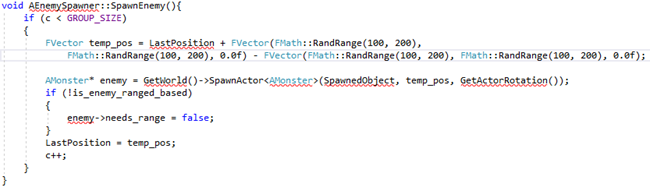
· SpaceShip, Radar, LandingPad, MainComputer, BatteryCharger: These are all objects used to trigger objective transition. For each one of them, when the proximity is triggered, they will check if a certain object is owned by the player and then react accordingly (e.g. the LandingPad will start spawning ants if the player if at a certain state of an objective, and once the player reached an object placed inside the LandingPad will trigger the GameOver -Player won reaching that spot after going through several previous tasks). Some of them do have two different mesh in the blueprint and when the player comes in with the right object they would show one rather than the other (e.g. object is broken, when player comes with item to fix it, show the fixed mesh instead).
Monster
The monster is thought to be the base class of all the enemies in the game, unluckily we only had one asset for enemies, so it ended up being our only enemy class. It does have full animation system and different collider to determine attack, seek or idle states.
Base class:
“Pawn”
Functionality:
Because of the various functionality given to this particular object, is worth going by each property and variable declared within the class and see what each does.
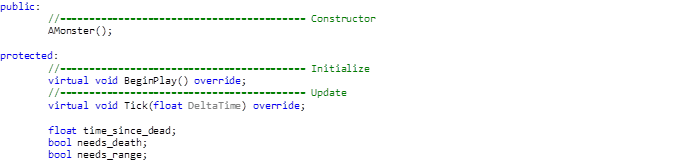
The first three methods declare are respectively: The
constructor (construct the object and sets some variables), BeginPlay
(the first function that gets called after the constructor, usually used for
initialisation), Tick (update function, called every frame, here all the
movements calculations are to be performed).
All the variable following regard state triggering: time_since_death
will determine the time after the death and for that given amount of time will
display a static death mesh declared afterward; needs_death
and needs_range are quite straight forward Boolean
variables, when true one will determine if the object needs to die, the other
if the object attack is range based or not.
![]()
The above two variables hold the avatar instance inside the
Monster object and an instance of the MainGate. This
is because the monster will either need to follow the avatar or the gate
positions (ants wait outside until the gate is opened).
In order to perform a follow behaviour in the Tick function a simple vector
math operation is applied.
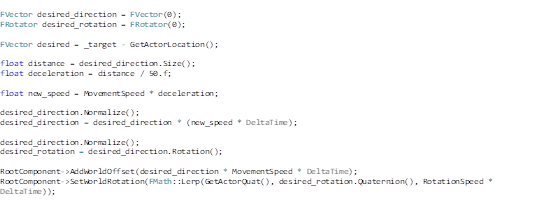
Two temporary variables are created and will hold the
direction to the target “desired_direction”
and the rotation to the target “desired_rotation”.
The direction is retrieved by getting the target position and substracting to the current object position. Then in order for them to decelerate it checks how big is the
distance between the target and the origin, this simply the length of the
direction vector. A new variable for deceleration is created by dividing the
distance by a max distance (50). Speed is evaluated by multiplying the default
speed by the deceleration and then the object is translated by the direction
vector and rotated by the rotator of this last.
The target position is either assigned to the player position or to the main gate position depending on which state the monster is in.
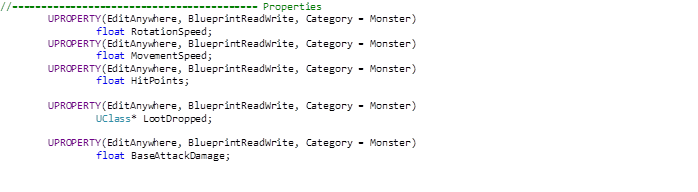
The above properties are shared with the blueprint editor so that can be easily tweaked. The name are quite self-explanatory. Loot dropped holds the object to be dropped when the enemy dies (in the game case this is an ammo pack).
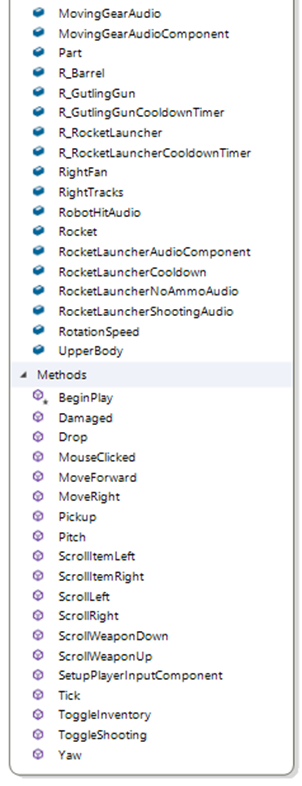
Avatar Object
The Avatar performs tasks required for movements around its axes as well as handling weapons, inventory and objectives to be later displayed on screen through Unreal widgets.
Base class:
“Character”
Functionality:
Among the methods available, the Avatar can call Pickup and Scrolling actions, which directly impact the relevant items currently contained in its class through Backpack, Objectives storage. Each of these items is iterated by sub-container separating weapons by tools.
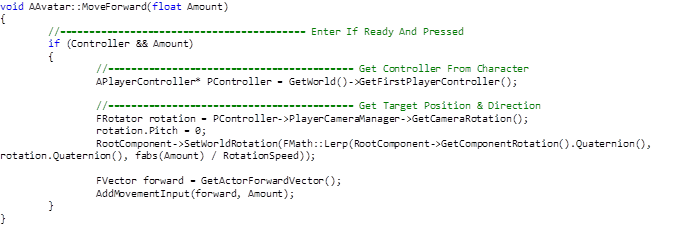
MoveForward and MoveRight methods, triggered by keyboard or controller inputs call-backs, move the Avatar by retrieving the Camera component attached to it, using its axes as directional vectors and input multiplier to change the current location.
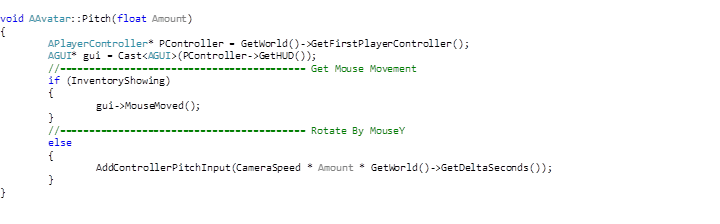
Pitch and Yaw triggered by mouse or analog controller inputs call-back, retrieve the Camera component rotation, updating it by the input multiplier. During the game these values are constantly capped by the Avatar Blueprint.

The ToggleShooting switch is triggered by key inputs call-backs to enable shooting mechanics or display the entire Backpack using Unreal widgets.
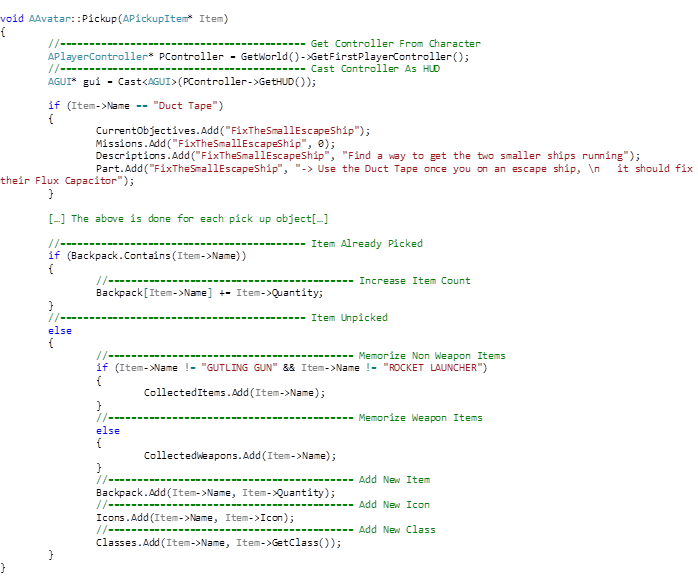
Pickup will make use of the object parsed as parameter to store relative inventory information’s like tag, image and quantity. During this action, the Avatar will also activate or stage inherent objectives or in case of weapons enable shooting mechanics and ammo usage.
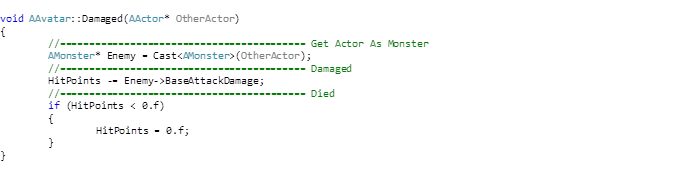
Damage will impact the player health through its collider’s BeginOverlap event, decreasing the player health by the second when the colliding object is successfully casted to a Monster class.
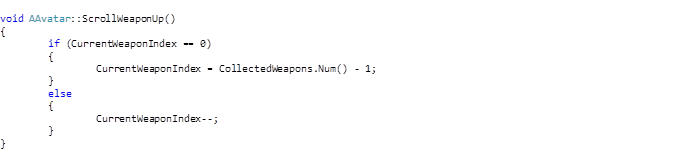
Scrolling methods have been attached to different keys call-backs iterating through the various objects listed and selecting the current one to be displayed and/or used while playing.
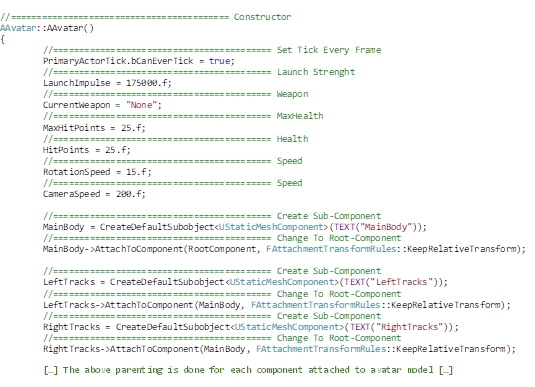
The Avatar constructor setup parenting and colliders call-backs, making sure each sub-component its attached to the correct root.
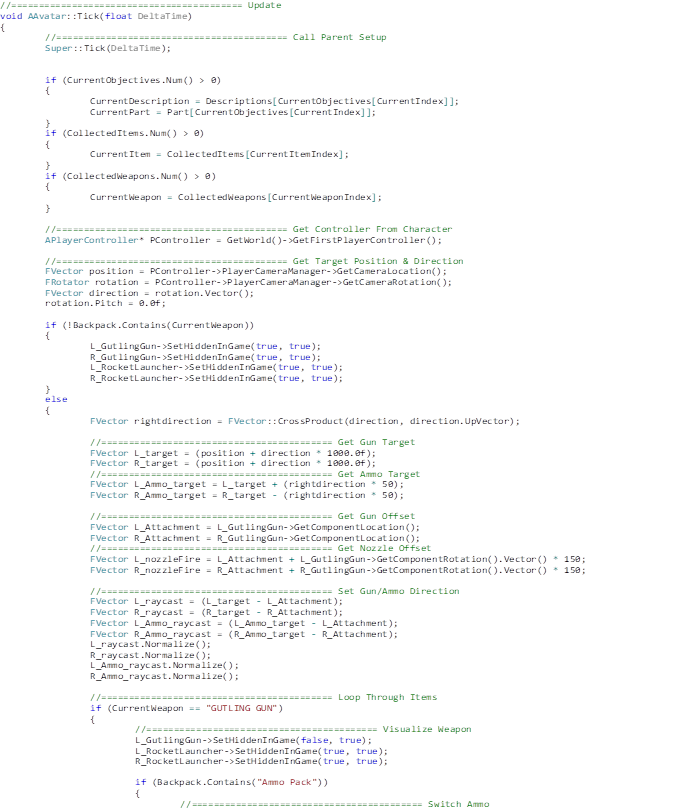
The Avatar update handles weapon by displaying the current selection and enabling shooting only when the relative ammo is contained in the inventory Backpack. When shooting, weapons adjust their direction to point toward targets by first retrieving the Camera component rotation then create temporary target (left-side and right-side). Ammunitions are then shot from nozzle location (offset along the target direction), then spawning the ammo of choice by casting the attached Blueprint to the correct ammo class, finally decrease the ammo quantity and destroying the Backpack object when ammo runout.
Spawner Object
Spawner objects are placed into the game world to spawn a blueprint class that is attached to them. They are used to spawn pick up items like bullets; and monsters.
Base Class:
“Spawner”
Child Classes:
“PickUpSpawner”, “EnemySpawner”
Functionality:
The base spawner class only contains a UClass reference which can be assigned in the blueprint. This reference is the object that will be spawned.
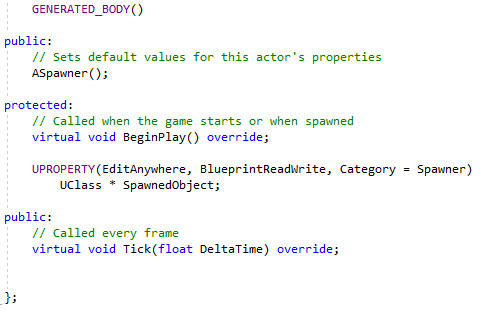

Both EnemySpawner and PickUpSpawner have their own spawning functions that make use of the SpawnedObject reference provided by the base spawner class.
Bullet Object
The bullet class is used by the avatar to shoot. These bullets are spawned by the avatar every time the player is shooting, and the bullets purpose is to collide with other objects whenever they are hit.
Base Class:
“Bullet”
Functionality:
The bullet class contains a mesh, proximity sphere for colliding with objects, a particle that will play every time the bullet hits something and an audio component that plays audio whenever the bullet collides.

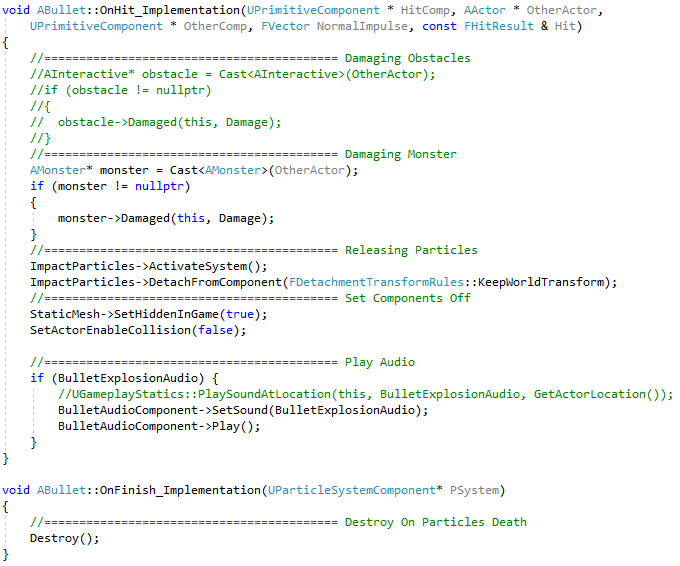
The bullet works by using the proximity sphere to check for collisions. Once a collision is detected the particle is activated and the mesh of the actual bullet is hidden; and the bullet audio is played. The particle has an OnFinish event that triggers as soon as the particle has finished playing, this event destroys the bullet.
Main Menu HUD
The HUD is responsible for playing the main menu blueprint widget onto the screen whenever the main menu level is loaded.
Base Class:
“ProtodevMenuGameMode”
Functionality:
The ProtodevMenuGameMode class contains a reference to a sub class of UUserWidget. This reference allows you to select in the blueprint a widget class that will be spawned by this reference.
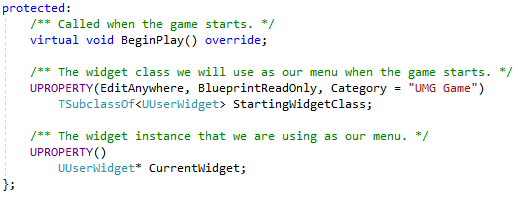
The class has a function called ChangedMenuWidget that is played as soon as the class is created, it is used to apply the StartingWidgetClass widget reference onto the screen. This function checks if the current widget already contains a widget applied to it, if it does then the widget is removed from the viewport. The next step is checking if the widget provided into the function is not null, if it’s not then it will be created, attached to the CurrentWidget variable and added to the viewport.

Class Diagrams
PickupItem Diagrams

Interactive Diagrams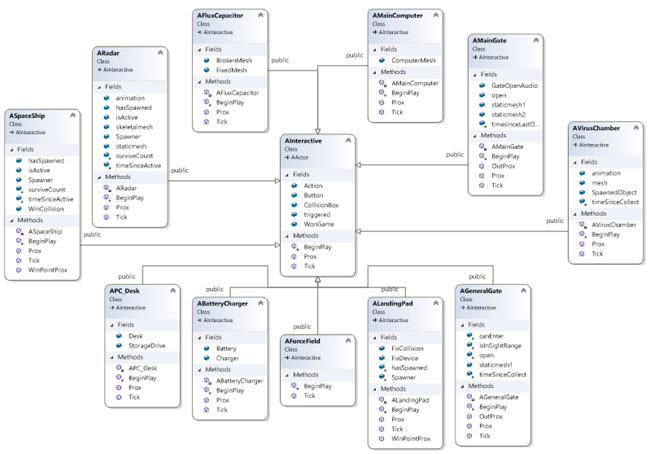
Avatar Diagram

Other Diagrams
Minimum System Requirements
RAM: 4GB
CPU: Quad-Core 2GHz Processor
GPU: 2GB VRAM Graphics Card
Operating System: Windows 7/8/10
HDD Space: 10GB